For this exercise I had to choose an image preferably one with a range of content in the foreground and background. I then cut L shapes to focus on different aspects of the image but found that I liked working in Photoshop with the crop tool which I figured was the same as having two L shapes so choose to work this way.
Initially I found it difficult to select an image, but then remembered about a photographers work I liked namely; Frederic Baque.
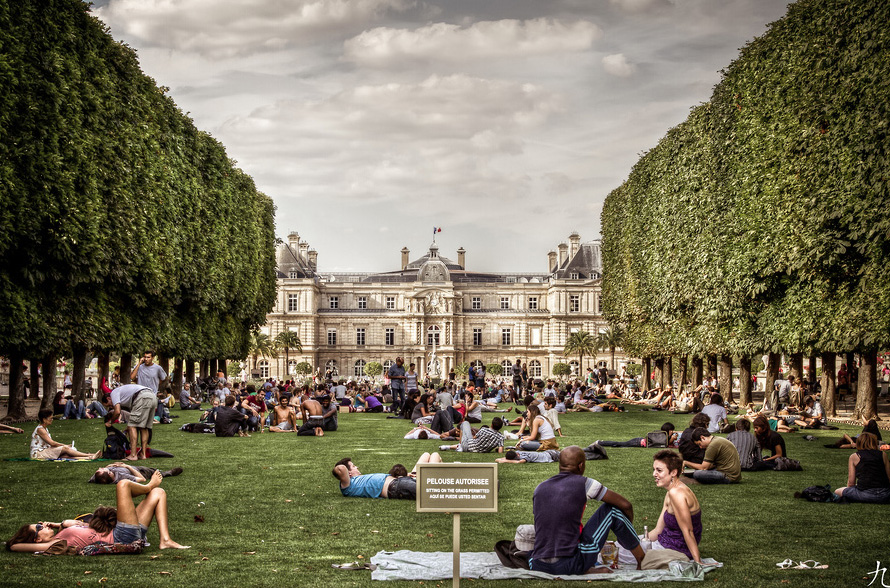
I really love images like this with lots going on and each time you see it you can see something else or imagine each persons story. This reminds me of Avril Paton's work in particular "Windows in the West" and the childrens book "The Jolly Postman".
I did a photography course and that taught me a lot about composing a photograph in terms of where to position subjects for good composition and various things to consider depending on where you want the emphasis/focus to be in your image. It's also great how an image can be cropped to draw focus to a particular subject/ area and make the overall composition more appealing. I'm starting to think about all this in regards to illustration and the same concepts apply in that sometimes focusing on a specific section can have a good impact and be suitable for the illustrations purpose.
 |
| Original image |
Online image Available from :
http://500px.com/frederic-baque [30th October 2012]
The original image is very busy but the couple at the front lead your eye into the image being positioned slightly off centre. This could potentially be one crop/ image in itself and makes me want to know what they're discussing!
 |
Cropped to focus on couple initially where your eye is drawn
WORDS - Love, Picnic, Discussion |
The crop below initially makes you look at the woman / figure lying on her stomach, but on closer inspection we can see another figure in the background doing the same thing.
 |
Cropped to focus on woman and child/ partner relaxing
WORDS - relax, unwind, chillin, summer, flat out, stressed, busy doing nothing
|
The crop below could be part of a different image as the man looks like hes preparing for a journey and packing his bag.
 |
Cropped to focus on man packing his bag
WORDS - packing, journey, adventurer |
 |
Cropped to focus on tree and building
WORDS - residence,windows |
I think the crops of the building/ palace have some drama about them, in particular the one with the flag maybe its because of the strong lines in the image and how the structure of the building is prominent in the frame/ image.
 |
Cropped to focus on centre of building
Words - palace, residence, doomsday |
 |
Cropped to focus on young people laughing
WORDS - friends, the joke |
 |
Cropped to focus on man reading
WORDS - quiet, contemplation, break time |
By itself the crop below has less drama as we don't really know the context the sign is placed in. Whereas if we add some figures back in, it puts it in a better context and clarifies the meaning.
 |
Cropped to focus on sign
WORDS - relax, chill, authority
|
 |
Cropped to focus on man alone
WORDS - contemplation, me time, the future, pose |
 |
Cropped to focus on man - he could almost be praying
WORDS - prayer |
 |
| Avril Paton - "Windows in the West" |
Avril Paton, Online image available from
http://www.avrilpaton.co.uk/ [Accessed 30th October 2012]
I then chose words for each image/crop that relates in some way to the content (shown above an in versions below).
I chose fonts which I thought reinforced the words/ scene.
Doomsday idea - harsh wide lettering, Study Time - bookish font, Friends - similar to Friends the TV show - loose laid back, explorer - wider text, bold, Authority - bold, stencil like.
 |
| Photoshop effects with doomsday crop |
The next stage involved developing one of the crops into a poster choosing a word to represent the image whether it contradicts the content or relates to the image.
I started sketching out some of the images above in my sketchbook just to get a feel for what might work as an image.
Reading the course notes I liked the idea of having some part of the illustration at the edge or overhanging the edge of the frame which could help to draw the viewers eye into the image so I thought I might experiment with this.
This exercise really got me thinking about the background to an image and how much detail is appropriate and how this impacts on the main aspect/ intended focus.
I then developed images from a few of the areas in the photo namely love - the couple looking at each other. I used pencil for this one and didn't think it looked that strong or conveyed the word.
I then tried unwind and did a few versions of this using very sketch like watercolour, pencils and ink.
I thought this worked better and added some backgrounds in photoshop to contrast with the figure.
 |
| Love |
In my first attempt at this one I wasn't so keen on the colours I used as I didn't feel they really led the viewers eye into the composition. I went back and chose some stronger tones emphasing more the areas of light and dark. I also had some struggles with the skin tone and trying to blend watercolours so that they don't look patchy yet still show the differences in tonal values. I still need to work on this but found that by spraying some water and blotting and by using lighter washes I got a better effect.
This is still something I need to work on and I'd like my tutor to perhaps give me some advice of how to achieve better skin tones and how to work with building up colour with watercolours.
I selected a font which portrayed the selected word "Unwind" due to its handwritten and loose lettering.
I still wasn't entirely happy with the "Unwind" image so had a look at another few areas of the photo.
I experimented with a man sitting reading for a "Serenity" Scene which I then put in front of a holiday snap.
Some of these I feel didn't work that great given that the background is quite harsh in contrast to the illustration which has become a bit lost against the backdrop.
I then produced an explorer type image and tried to make it look like the figure was embarking on a journey at the bottom of a mountain face with his rucksack by using another of my photographs from my travels. I then experimented with some cut out effects in photoshop and using HDR tonal effects to create different colour saturations and contasts and selecting a bold text to emphasis the journey.
 |
| Holiday photo with image |
 |
| Explorer and serenity/contemplation images |
 |
| Holiday photography with image - image a bit lost |
 |
| Background grass effect and shadow - image not quite as lost against backdrop |
 |
| Photoshop HDR effect |
I think the image above is the strongest for a poster and the text and image match - in that the composition is appropriate. I still need to work on my drawing / painting skills which as ever is a work in progress but this exercise was really good at thinking about being selective in what to include in a composition and the positioning of items within the frame. I'm also really enjoying using photoshop and experimenting with effects but am aware I don't want to become seduced by it and over doing things! So far I've found it hard selecting appropriate backdrops for images which work with the illustration and I think I've just about got off with it for this exercise but is something which I need to continue to work on .